Kubernetes 集群搭建
by FlyFlyPeng
目标
采用 kubernetes.io 官方推荐的 kubeadm 工具安装 kubernetes 集群。
- Docker版本:18.06.0-ce
- Kubernetes版本:v1.18.0
集群规划
| 角色 | 主机名 | IP地址 | 系统 |
|---|---|---|---|
| Master | flyflypeng-VirtualBox-k8s-master | 192.168.5.154 | Ubuntu 16.04.5 LTS (Xenial Xerus) |
| Woker | flyflypeng-desktop-k8s-worker | 192.168.5.8 | Ubuntu 18.04.1 LTS (Bionic Beaver) |
环境配置自检
-
硬件环境要求
- One or more machines running Ubuntu 16.04+, CentOS 7 or HypriotOS v1.0.1+
- 1GB or more of RAM per machine (any less will leave little room for your apps)
- Full network connectivity between all machines in the cluster (public or private network is fine)
-
关闭系统中的内存 swap 功能
# 查看系统是否启用了 swap cat /proc/swaps Filename Type Size Used Priority /dev/sda5 partition 2095100 0 -1 # 禁用 swap 功能 swapoff -a -
关闭防火墙
systemctl stop firewalld systemctl disable firewalld -
关闭selinux
setenforce 0 sed -i "s/SELINUX=enforcing/SELINUX=disabled/g" /etc/selinux/config -
修改 /etc/sysctl.conf
  # 如果有配置,则修改
  sed -i "s#^net.ipv4.ip_forward.*#net.ipv4.ip_forward=1#g"  /etc/sysctl.conf
  sed -i "s#^net.bridge.bridge-nf-call-ip6tables.*#net.bridge.bridge-nf-call-ip6tables=1#g"  /etc/sysctl.conf
  sed -i "s#^net.bridge.bridge-nf-call-iptables.*#net.bridge.bridge-nf-call-iptables=1#g"  /etc/sysctl.conf
  sed -i "s#^net.ipv6.conf.all.disable_ipv6.*#net.ipv6.conf.all.disable_ipv6=1#g"  /etc/sysctl.conf
  sed -i "s#^net.ipv6.conf.default.disable_ipv6.*#net.ipv6.conf.default.disable_ipv6=1#g"  /etc/sysctl.conf
  sed -i "s#^net.ipv6.conf.lo.disable_ipv6.*#net.ipv6.conf.lo.disable_ipv6=1#g"  /etc/sysctl.conf
  sed -i "s#^net.ipv6.conf.all.forwarding.*#net.ipv6.conf.all.forwarding=1#g"  /etc/sysctl.conf
  # 可能没有,追加
  echo "net.ipv4.ip_forward = 1" >> /etc/sysctl.conf
  echo "net.bridge.bridge-nf-call-ip6tables = 1" >> /etc/sysctl.conf
  echo "net.bridge.bridge-nf-call-iptables = 1" >> /etc/sysctl.conf
  echo "net.ipv6.conf.all.disable_ipv6 = 1" >> /etc/sysctl.conf
  echo "net.ipv6.conf.default.disable_ipv6 = 1" >> /etc/sysctl.conf
  echo "net.ipv6.conf.lo.disable_ipv6 = 1" >> /etc/sysctl.conf
  echo "net.ipv6.conf.all.forwarding = 1"  >> /etc/sysctl.conf
  # 执行命令以应用
  sysctl -p
安装docker以及kubelet,kubeadm,kubectl
docker安装
Docker的安装方法详见笔记:《Docker 安装配置》
docker 版本信息:
root@flyflypeng-desktop-k8s-worker:/home/flyflypeng/Code/scripts# docker version
Client:
 Version:           18.06.0-ce
 API version:       1.38
 Go version:        go1.10.3
 Git commit:        0ffa825
 Built:             Wed Jul 18 19:09:54 2018
 OS/Arch:           linux/amd64
 Experimental:      false

Server:
 Engine:
  Version:          18.06.0-ce
  API version:      1.38 (minimum version 1.12)
  Go version:       go1.10.3
  Git commit:       0ffa825
  Built:            Wed Jul 18 19:07:56 2018
  OS/Arch:          linux/amd64
  Experimental:     false
kubeadm, kubelet and kubectl安装
参考官方文档:安装 kubeadm
# 安装kubeadm, kubelet and kubectl
apt-get update && sudo apt-get install -y apt-transport-https curl
curl -s https://packages.cloud.google.com/apt/doc/apt-key.gpg | sudo apt-key add -
cat <<EOF | sudo tee /etc/apt/sources.list.d/kubernetes.list
deb https://apt.kubernetes.io/ kubernetes-xenial main
EOF
apt-get update
apt-get install -y kubelet kubeadm kubectl
apt-mark hold kubelet kubeadm kubectl
kubectl命令自动补全设置
source /usr/share/bash-completion/bash_completion
source <(kubectl completion bash)
echo "source <(kubectl completion bash)" >> ~/.bashrc
k8s集群配置
解决k8s镜像被墙问题
由于官方镜像地址被墙,所以我们需要首先获取所需镜像以及它们的版本。然后从国内镜像站获取。
kubeadm config images list
获取镜像列表后可以通过下面的脚本从dockerhub上获取镜像并重命名:
#!/bin/bash

images=(kube-apiserver:v1.18.0 \
	kube-controller-manager:v1.18.0 \
	kube-scheduler:v1.18.0 \
	kube-proxy:v1.18.0 \
	pause:3.2 \
	etcd:3.4.3-0 \
	coredns:1.6.7)

for imageName in ${images[@]} ; do
    docker pull aiotceo/$imageName
    docker tag aiotceo/$imageName k8s.gcr.io/$imageName
    docker rmi aiotceo/$imageName
done
)
下载 k8s 所需的各个组件的镜像如下所示:
root@flyflypeng-VirtualBox-k8s-master:/home/flyflypeng/Code/scripts# docker images
REPOSITORY                           TAG                 IMAGE ID            CREATED             SIZE
k8s.gcr.io/kube-proxy                v1.18.0             43940c34f24f        3 days ago          117MB
k8s.gcr.io/kube-controller-manager   v1.18.0             d3e55153f52f        3 days ago          162MB
k8s.gcr.io/kube-apiserver            v1.18.0             74060cea7f70        3 days ago          173MB
k8s.gcr.io/kube-scheduler            v1.18.0             a31f78c7c8ce        3 days ago          95.3MB
k8s.gcr.io/pause                     3.2                 80d28bedfe5d        6 weeks ago         683kB
k8s.gcr.io/coredns                   1.6.7               67da37a9a360        8 weeks ago         43.8MB
k8s.gcr.io/etcd                      3.4.3-0             303ce5db0e90        5 months ago        288MB
Master Node配置
kubeadm init初始化环境
通过kubeadm init命令来初始化Master节点:
kubeadm init --pod-network-cidr=192.168.0.0/16 --apiserver-advertise-address=192.168.5.154
在实际的部署当中需要将 --apiserver-advertise-address 参数后面的值设置为当前主机的ip地址。
--apiserver-advertise-address:API 服务器所公布的其正在监听的 IP 地址。如果未设置,则使用默认网络接口。--pod-network-cidr:指明 pod 网络可以使用的 IP 地址段。如果设置了这个参数,控制平面将会为每一个节点自动分配 CIDRs。如果要配置calico网络插件,这个值一定要设置为192.168.0.0/16
初始化成功之后的输出信息如下所示:
root@flyflypeng-VirtualBox-k8s-master:/home/flyflypeng/Code/scripts# kubeadm init --pod-network-cidr=10.244.0.0/16 --apiserver-advertise-address=192.168.5.154
W0329 02:35:23.887370   13950 configset.go:202] WARNING: kubeadm cannot validate component configs for API groups [kubelet.config.k8s.io kubeproxy.config.k8s.io]
[init] Using Kubernetes version: v1.18.0
[preflight] Running pre-flight checks
	[WARNING IsDockerSystemdCheck]: detected "cgroupfs" as the Docker cgroup driver. The recommended driver is "systemd". Please follow the guide at https://kubernetes.io/docs/setup/cri/
[preflight] Pulling images required for setting up a Kubernetes cluster
[preflight] This might take a minute or two, depending on the speed of your internet connection
[preflight] You can also perform this action in beforehand using 'kubeadm config images pull'
[kubelet-start] Writing kubelet environment file with flags to file "/var/lib/kubelet/kubeadm-flags.env"
[kubelet-start] Writing kubelet configuration to file "/var/lib/kubelet/config.yaml"
[kubelet-start] Starting the kubelet
[certs] Using certificateDir folder "/etc/kubernetes/pki"
[certs] Generating "ca" certificate and key
[certs] Generating "apiserver" certificate and key
[certs] apiserver serving cert is signed for DNS names [flyflypeng-virtualbox-k8s-master kubernetes kubernetes.default kubernetes.default.svc kubernetes.default.svc.cluster.local] and IPs [10.96.0.1 192.168.5.154]
[certs] Generating "apiserver-kubelet-client" certificate and key
[certs] Generating "front-proxy-ca" certificate and key
[certs] Generating "front-proxy-client" certificate and key
[certs] Generating "etcd/ca" certificate and key
[certs] Generating "etcd/server" certificate and key
[certs] etcd/server serving cert is signed for DNS names [flyflypeng-virtualbox-k8s-master localhost] and IPs [192.168.5.154 127.0.0.1 ::1]
[certs] Generating "etcd/peer" certificate and key
[certs] etcd/peer serving cert is signed for DNS names [flyflypeng-virtualbox-k8s-master localhost] and IPs [192.168.5.154 127.0.0.1 ::1]
[certs] Generating "etcd/healthcheck-client" certificate and key
[certs] Generating "apiserver-etcd-client" certificate and key
[certs] Generating "sa" key and public key
[kubeconfig] Using kubeconfig folder "/etc/kubernetes"
[kubeconfig] Writing "admin.conf" kubeconfig file
[kubeconfig] Writing "kubelet.conf" kubeconfig file
[kubeconfig] Writing "controller-manager.conf" kubeconfig file
[kubeconfig] Writing "scheduler.conf" kubeconfig file
[control-plane] Using manifest folder "/etc/kubernetes/manifests"
[control-plane] Creating static Pod manifest for "kube-apiserver"
[control-plane] Creating static Pod manifest for "kube-controller-manager"
W0329 02:35:28.725001   13950 manifests.go:225] the default kube-apiserver authorization-mode is "Node,RBAC"; using "Node,RBAC"
[control-plane] Creating static Pod manifest for "kube-scheduler"
W0329 02:35:28.726217   13950 manifests.go:225] the default kube-apiserver authorization-mode is "Node,RBAC"; using "Node,RBAC"
[etcd] Creating static Pod manifest for local etcd in "/etc/kubernetes/manifests"
[wait-control-plane] Waiting for the kubelet to boot up the control plane as static Pods from directory "/etc/kubernetes/manifests". This can take up to 4m0s
[apiclient] All control plane components are healthy after 28.508549 seconds
[upload-config] Storing the configuration used in ConfigMap "kubeadm-config" in the "kube-system" Namespace
[kubelet] Creating a ConfigMap "kubelet-config-1.18" in namespace kube-system with the configuration for the kubelets in the cluster
[upload-certs] Skipping phase. Please see --upload-certs
[mark-control-plane] Marking the node flyflypeng-virtualbox-k8s-master as control-plane by adding the label "node-role.kubernetes.io/master=''"
[mark-control-plane] Marking the node flyflypeng-virtualbox-k8s-master as control-plane by adding the taints [node-role.kubernetes.io/master:NoSchedule]
[bootstrap-token] Using token: l09phn.zkiuy0ipc2yp6syq
[bootstrap-token] Configuring bootstrap tokens, cluster-info ConfigMap, RBAC Roles
[bootstrap-token] configured RBAC rules to allow Node Bootstrap tokens to get nodes
[bootstrap-token] configured RBAC rules to allow Node Bootstrap tokens to post CSRs in order for nodes to get long term certificate credentials
[bootstrap-token] configured RBAC rules to allow the csrapprover controller automatically approve CSRs from a Node Bootstrap Token
[bootstrap-token] configured RBAC rules to allow certificate rotation for all node client certificates in the cluster
[bootstrap-token] Creating the "cluster-info" ConfigMap in the "kube-public" namespace
[kubelet-finalize] Updating "/etc/kubernetes/kubelet.conf" to point to a rotatable kubelet client certificate and key
[addons] Applied essential addon: CoreDNS
[addons] Applied essential addon: kube-proxy

Your Kubernetes control-plane has initialized successfully!

To start using your cluster, you need to run the following as a regular user:

  mkdir -p $HOME/.kube
  sudo cp -i /etc/kubernetes/admin.conf $HOME/.kube/config
  sudo chown $(id -u):$(id -g) $HOME/.kube/config

You should now deploy a pod network to the cluster.
Run "kubectl apply -f [podnetwork].yaml" with one of the options listed at:
  https://kubernetes.io/docs/concepts/cluster-administration/addons/

Then you can join any number of worker nodes by running the following on each as root:

kubeadm join 192.168.5.154:6443 --token l09phn.zkiuy0ipc2yp6syq \
    --discovery-token-ca-cert-hash sha256:46aba676954319993945204e35e63ad7659475921820f2ca5b430c1f75e2cd7d
配置授权信息
所需的命令在init成功后也会有提示,主要是为了保存相关的配置信息在用户目录下,这样不用每次都输入相关的认证信息。
 mkdir -p $HOME/.kube
cp -i /etc/kubernetes/admin.conf $HOME/.kube/config
chown $(id -u):$(id -g) $HOME/.kube/config
配置网络插件
在部署具体的应用之前,首先需要按照好集群中的 Pod 网络插件,而 Pod 网络插件的主要作用就是提供一个 Pod 之间可以通信的虚拟网络层。其中 Pod 网络插件有多种选择,这里选用 Calico 作为例子。
kubectl apply -f https://docs.projectcalico.org/v3.11/manifests/calico.yaml
确认calico网络插件是否配置好,只要去检查CoreDNS Pod是否处于Running状态,检查的方法如下:
root@flyflypeng-VirtualBox-k8s-master:/home/flyflypeng/k8s# kubectl get pods --all-namespaces
NAMESPACE     NAME                                                       READY   STATUS    RESTARTS   AGE
kube-system   calico-kube-controllers-5b8b769fcd-xxftq                   1/1     Running   1          11m
kube-system   calico-node-tkswj                                          1/1     Running   0          11m
kube-system   coredns-66bff467f8-cpxnv                                   1/1     Running   0          4m5s
kube-system   coredns-66bff467f8-p759z                                   1/1     Running   0          4m6s
kube-system   etcd-flyflypeng-virtualbox-k8s-master                      1/1     Running   1          9h
kube-system   kube-apiserver-flyflypeng-virtualbox-k8s-master            1/1     Running   1          9h
kube-system   kube-controller-manager-flyflypeng-virtualbox-k8s-master   1/1     Running   4          9h
kube-system   kube-proxy-tb9z4                                           1/1     Running   1          9h
kube-system   kube-scheduler-flyflypeng-virtualbox-k8s-master            1/1     Running   5          9h
解决coreDNS容器无法启动问题的方法:
- coredns pods have CrashLoopBackOff or Error state
- 搭建Kubernetes集群踩坑日志之coreDNS 组件出现CrashLoopBackOff问题的解决
调整 Master Node 执行 Pod 的策略(可选)
我在前面提到过,默认情况下 Master 节点是不允许运行用户 Pod 的。而 Kubernetes 做到这一点,依靠的是 Kubernetes 的 Taint/Toleration 机制。
它的原理非常简单:一旦某个节点被加上了一个 Taint,即被“打上了污点”,那么所有 Pod 就都不能在这个节点上运行,因为 Kubernetes 的 Pod 都有“洁癖”。 除非,有个别的 Pod 声明自己能“容忍”这个“污点”,即声明了 Toleration,它才可以在这个节点上运行。
其中,为节点打上“污点”(Taint)的命令是:
$ kubectl taint nodes --all node-role.kubernetes.io/master-
我这里就不在Master节点上部署用户的业务容器了,所有的容器都部署在Worker节点上。
Worker节点配置
获得 join命令参数
# 在 master 节点上执行
root@flyflypeng-VirtualBox-k8s-master:/home/flyflypeng/k8s# kubeadm token create --print-join-command
W0329 12:09:29.488896   20698 configset.go:202] WARNING: kubeadm cannot validate component configs for API groups [kubelet.config.k8s.io kubeproxy.config.k8s.io]
kubeadm join 192.168.5.154:6443 --token 1xkojk.uuxo8th0njy75d2g     --discovery-token-ca-cert-hash sha256:cf93dfbf1a653dd82e61220c567a70c1ed725396e740277c29fb49eb966a9677
准备worker上的镜像
首先worker节点上也要下载k8s相关的镜像,worker上必备镜像列表:
root@flyflypeng-desktop-k8s-worker:/home/flyflypeng/k8s# docker images
REPOSITORY                  TAG                 IMAGE ID            CREATED             SIZE
k8s.gcr.io/kube-proxy       v1.18.0             43940c34f24f        3 days ago          117MB
k8s.gcr.io/pause            3.2                 80d28bedfe5d        6 weeks ago         683kB
初始化Worker节点
root@flyflypeng-desktop-k8s-worker:/home/flyflypeng# kubeadm join 192.168.5.154:6443 --token 1xkojk.uuxo8th0njy75d2g     --discovery-token-ca-cert-hash sha256:cf93dfbf1a653dd82e61220c567a70c1ed725396e740277c29fb49eb966a9677

root@flyflypeng-desktop-k8s-worker:/home/flyflypeng# kubeadm join 192.168.5.154:6443 --token 1xkojk.uuxo8th0njy75d2g     --discovery-token-ca-cert-hash sha256:cf93dfbf1a653dd82e61220c567a70c1ed725396e740277c29fb49eb966a9677
W0329 12:10:42.264742     655 join.go:346] [preflight] WARNING: JoinControlPane.controlPlane settings will be ignored when control-plane flag is not set.
[preflight] Running pre-flight checks
[preflight] Reading configuration from the cluster...
[preflight] FYI: You can look at this config file with 'kubectl -n kube-system get cm kubeadm-config -oyaml'
[kubelet-start] Downloading configuration for the kubelet from the "kubelet-config-1.18" ConfigMap in the kube-system namespace
[kubelet-start] Writing kubelet configuration to file "/var/lib/kubelet/config.yaml"
[kubelet-start] Writing kubelet environment file with flags to file "/var/lib/kubelet/kubeadm-flags.env"
[kubelet-start] Starting the kubelet
[kubelet-start] Waiting for the kubelet to perform the TLS Bootstrap...

This node has joined the cluster:
* Certificate signing request was sent to apiserver and a response was received.
* The Kubelet was informed of the new secure connection details.

Run 'kubectl get nodes' on the control-plane to see this node join the cluster.
最后我们在Master节点上运行kubectl get nodes查看Worker节点是否已经加入了:
root@flyflypeng-VirtualBox-k8s-master:/home/flyflypeng/k8s# kubectl get nodes -o wide
NAME                               STATUS   ROLES    AGE   VERSION   INTERNAL-IP     EXTERNAL-IP   OS-IMAGE             KERNEL-VERSION      CONTAINER-RUNTIME
flyflypeng-desktop-k8s-worker      Ready    <none>   11m   v1.18.0   192.168.5.8     <none>        Ubuntu 18.04.1 LTS   4.15.0-88-generic   docker://18.6.0
flyflypeng-virtualbox-k8s-master   Ready    master   9h    v1.18.0   192.168.5.154   <none>        Ubuntu 16.04.5 LTS   4.15.0-36-generic   docker://18.6.0
注意:如果原来已经加入 Cluster 的 Node 重启之后,需要通过 kubeadm reset 重置当前 Node 的环境,然后重新使用 kubeadm join 来将当前 Node 加入到 Master Node 管理。
部署其他插件
由于很多官方的插件所需镜像也在 http://gcr.io 上,所以遇到这种情况,可以通过下面的方式获取:kubernetes安装(国内环境)
将yaml文件中镜像地址的k8s.gcr.io替换成registry.cn-hangzhou.aliyuncs.com/google_containers
在其他机器上访问集群
如果你想通过你的Mac来访问你搭建的集群,你可以将集群的administrator的配置文件拷贝到的你的Mac上,用法如下:
scp root@<control-plane-host>:/etc/kubernetes/admin.conf .
kubectl --kubeconfig ./admin.conf get nodes
为了避免每次都敲kubectl命令时都加上配置选项--kubeconfig,我们可以简单地在shell配置环境中的加个alias:
# kubectl --kubeconfig alias
alias kubectl='kubectl --kubeconfig /Users/woshijpf/k8s/admin.conf'
清理集群
我现在还没这么干过,但是记录一下清理的方法,万一哪天就用到了呢。
使用k8s部署Web应用
到现在为止,我们已经把k8s集群搭建完了,现在我们可以部署一个Node应用来验证我们搭建的k8s集群是否可以正常工作。
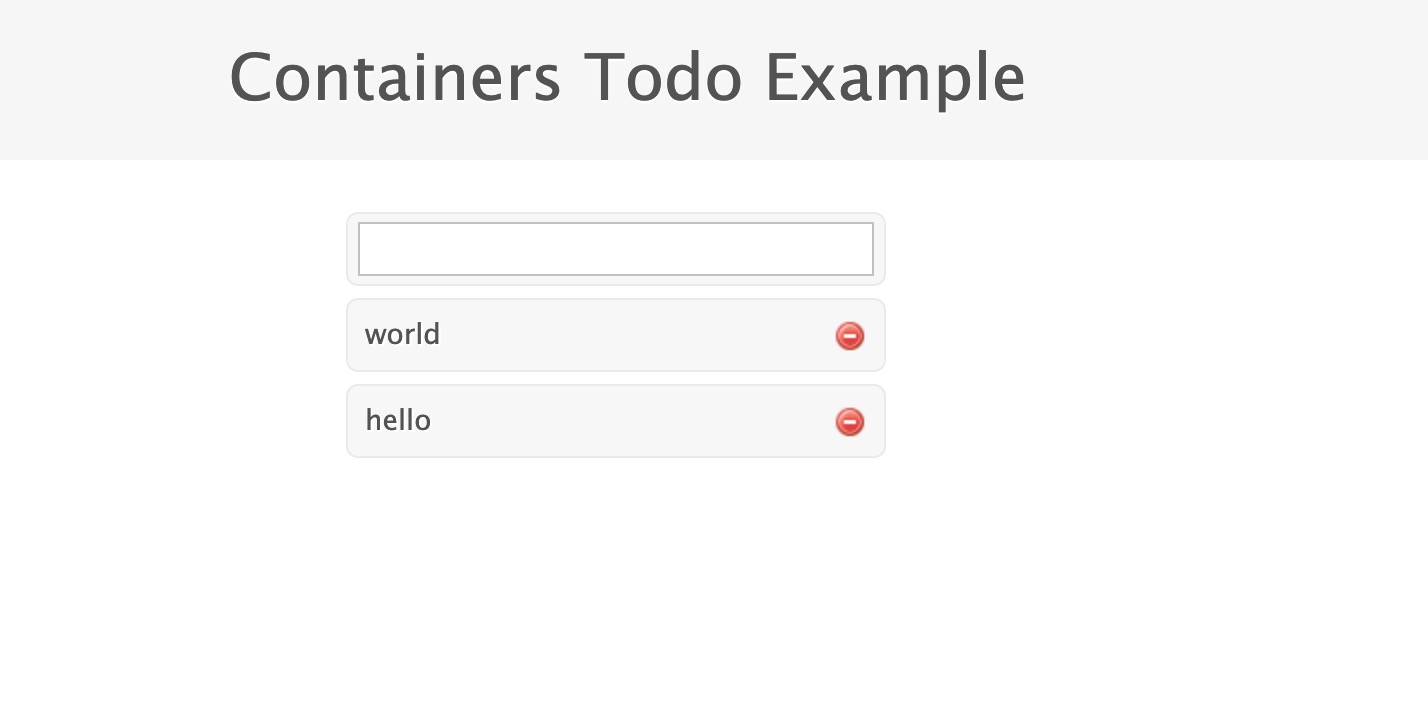
这部分我从网站上找了一个例子,部署一个待办事项的Web App,大家直接参考这篇文章吧:入门系列之Kubernetes部署
部署完成之后,查看Web App服务在Worker节点暴露出来的端口号:
$ kubectl get services
NAME         TYPE        CLUSTER-IP      EXTERNAL-IP   PORT(S)          AGE
db           ClusterIP   10.106.46.173   <none>        27017/TCP        50m
kubernetes   ClusterIP   10.96.0.1       <none>        443/TCP          20h
web          NodePort    10.101.158.14   <none>        3000:32678/TCP   36m
通过浏览器访问Worker节点上http://192.168.5.8:32678地址:
下面是我kubenetes v1.18.0版本上验证过的yaml文件:
db-pod.yaml
apiVersion: v1
kind: Pod
metadata:
  name: db
  labels:
    name: mongo
spec:
      containers:
      - image: mongo
        name: mongo
        ports:
        - name: mongo
          containerPort: 27017
        volumeMounts:
          - name: mongo-storage
            mountPath: /data/db
      volumes:
          - name: mongo-storage
            hostPath:
              path: /data/db
db-service.yaml
apiVersion: v1
kind: Service
metadata:
  name: db
  labels:
    name: mongo
    app: todoapp

spec:
  selector:
    name: mongo
  type: ClusterIP
  ports:
    - name: db
      port: 27017
      targetPort: 27017
web-pod.yaml
apiVersion: v1
kind: Pod
metadata:
  name: web
  labels:
    name: web
    app: todoapp
spec:
  containers:
    - image: sammy/todo
      imagePullPolicy: IfNotPresent
      name: myweb
      ports:
        - containerPort: 3000
web-service.yaml
apiVersion: v1
kind: Service
metadata:
  name: web
  labels:
    name: web
    app: todoapp

spec:
  selector:
    name: web
  type: NodePort
  ports:
   - name: http
     port: 3000
     targetPort: 3000
     protocol: TCP
web-rs.yaml
apiVersion: apps/v1
kind: ReplicaSet
metadata:
  name: web
  labels:
    name: web
    app: todoapp

spec:
  replicas: 3
  selector:
    matchLabels:
      app: todoapp
  template:
    metadata:
      labels:
        name: web
        app: todoapp
    spec:
      containers:
      - name: web
        imagePullPolicy: IfNotPresent
        image: sammy/todo
        ports:
        - containerPort: 3000
注意事项:
- 如果不想将镜像上传到dockerhub上,直接在worker节点上使用编译出来的镜像,则需要在部署web app的
web-pod.yaml文件中添加上镜像拉去的策略imagePullPolicy: IfNotPresent - 副本集(ReplicaSet)的测试过程中,要将yaml文件中的
apiVersion的值从extensions/v1beta1替换成apps/v1,因为extensions/v1beta1已经被弃用了。
FAQ
k8s镜像拉取策略配置
k8s的部署配置文件中经常看到有imagePullPolicy属性,这个属性是描述镜像的拉取策略:
- Always 总是拉取镜像
- IfNotPresent 本地有则使用本地镜像,不拉取
- Never 只使用本地镜像,从不拉取,即使本地没有
如果省略imagePullPolicy,镜像tag为 :latest,策略为always。
参考文章
Subscribe via RSS